
How-To Install A TF067300AJ Valve Plate Kit
This document covers the installation of the TF067300AJ Valve Plate kit.
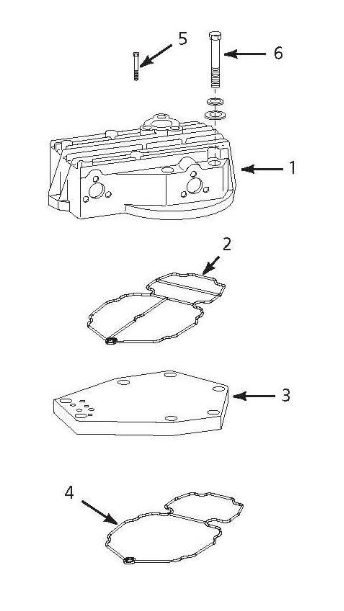
Valve Plate Kit TF067300AJ Installation Instructions
|
The valve plate design for your compressor has changed.
The new design offers the same performance (cfm) as the
Additionally, the o-rings allow greater heat transfer through
To take advantage of these improvements, a new head
To change the valve plate, follow the steps below: 1) To remove air filter assembly: (a) Unscrew wing nut on air filter and remove washer (b) Remove top filter housing and air filter element (c) Unscrew 3 bolts holding bottom filter housing to head (d) Remove bottom filter housing and o-ring seal Save all parts -- they will be used on new head.
2) Remove 9 head bolts. Pry off head and valve plate
3) New valve plate installation:
(a) Install the valve-plate-to-cylinder o-ring by pressing it
(b) Install the head-to-valve-plate o-ring into the top
(c) Fasten the head to the valve plate with the head-to-
(d) Torque screw to 100 in-lbs. 4) Make sure cylinder surface is clean.
5) Install head and valve plate assembly on cylinder.
|
|
Recent Posts
-

The Heart of Your Pump: Understanding Pump Intake & Exhaust Valves & Their Failures
At Master Tool Repair, we talk to customers every day who are frustrated by a compressor that just i …Mar 19, 2026 -

Boost Efficiency: The Benefits of Quick-Connect Couplings
Have you ever found yourself wrestling with threaded fittings while trying to swap out air tools, lo …Mar 11, 2026 -

How to Choose the Right Replacement Pump: Oil-Free vs Oil-Bath, CFM, and RPM
Replacing a tired air compressor pump is one of the fastest ways to restore airflow, tool performanc …Mar 3, 2026